The trucks and wheels had to be blasted again but they look amazing
Thursday, December 1, 2016
She has a fresh new look!!
The long awaited day has come. She is finally painted. We are going to have the logo and stripe done in the next few weeks.
Monday, August 22, 2016
The last bit of welding
The weekend was spent doing , what i will hope is the last bit of welding.
I could spend so many more hours on the ol' girl but we need to get her final "make-up" on.
At this point I will still need to sand an few rough spots where I used the metal filler.
I will be visiting her, a few evenings to be looking for any remaining holes that I may have missed.
My plan is to have a very powerful light inside the car and to examine the outside and look for light leaks.
I believe she is watertight but I want to be sure.
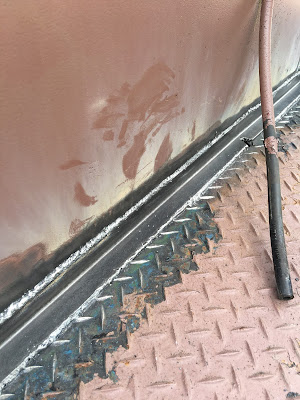
Here are some shots from Saturday.
The rust was pretty bad.
I had to cut down and then grind the lip off the floor section. After, I used clamps to draw the wall of the car and the new angle iron that I attached to the floor first.
The corners where water can sit were bad
I sill wish I was a better welder. I would rather is be pretty and strong
The few spots of silver are the areas that I used the filler to smooth out.
Nothing structural was done with that.
Just don't trust it.
Monday, May 16, 2016
Working toward Paint , fixing the Decks
This weekend was spent repairing the decks on the front and back of the car. When the wall of the car rusted away, someone decided to fill the gap with tar. Well, that was not going to do. So.....the first thing s to remove the tar! This was a time consuming process SURPRISE!
This is what the seam of the deck, where it meets the wall of the car.
This is one of the four. Some worse than others but all needing attention
I cleaned the gap and exposed the opening.
Then I cut a piece of angle iron and fitted it to the area. I grind down the lip on the deck that once joined to the car. Then ground down the diamond pattern from the deck surface so the new piece would lay on a better surface, without gaps. This also helped the welding look nicer.
There was a overflow hose from the fill ports on the wall of the car. I cut that back in also.
All welded up! I had to wedge a 2x4 from the inside of the car to push the wall back into place and remove the gap that time and rust created.
The silver was a bit of seam sealer. It is primed and looks nice.
Three more to go!
Tuesday, April 5, 2016
Cleaning the underside of my dirty caboose
Today I spent the day cleaning the wheels and trucks on the bottom of the caboose.
The problem with this process is that the oil and dirt that has adhered to the wheels and the suspension had hardened over the last 50 years.
I tried to apply heat but it only caused the crud to stick even worse.
The only effective way to get this nasty stuff off was to use a hammer and chisel.
The sandblasting did not budge it.
It was a very slow process. ( big surprise )
I took a break from the wheels to do a bit more on the decks.
There is a tar based filler that has to be removed before I can weld the patch that will join the deck and the walls of the car.
There are four areas that will need this attention.
The days are getting longer and warmer.
Thank God.
Subscribe to:
Comments (Atom)


